
Using the In-Gun Menu System
Onboard Menu System
Each Blamcon light gun comes with an onboard configuration menu. You can use this feature to set and change various configurable settings. While active, it pauses the standard play mode function. Any of the changes made in the system menu will be saved to the gun.
Navigating the Menu
Hold the B button while pointing the light gun offscreen to enter the menu, the light gun should vibrate once and the LED will light up.
The A button will move you to the next menu item. The B button will move you back one menu level.
The Trigger button will move you to the next menu level or will accept the current selection.
At any time, hold the B button for 4 seconds to exit the menu without making any changes.
Menu areas are color coded. Moving forward will change sections. Pressing the trigger will enter a sub-menu. Sub-menu items are coded by flashes, so 1 flash for the first item, 2 flashes for the second, etc. Pressing the trigger on a sub-menu item will save your selection and exit the menu. If you reach the end of a menu, it will cycle back to the first item.
Menu Option Map
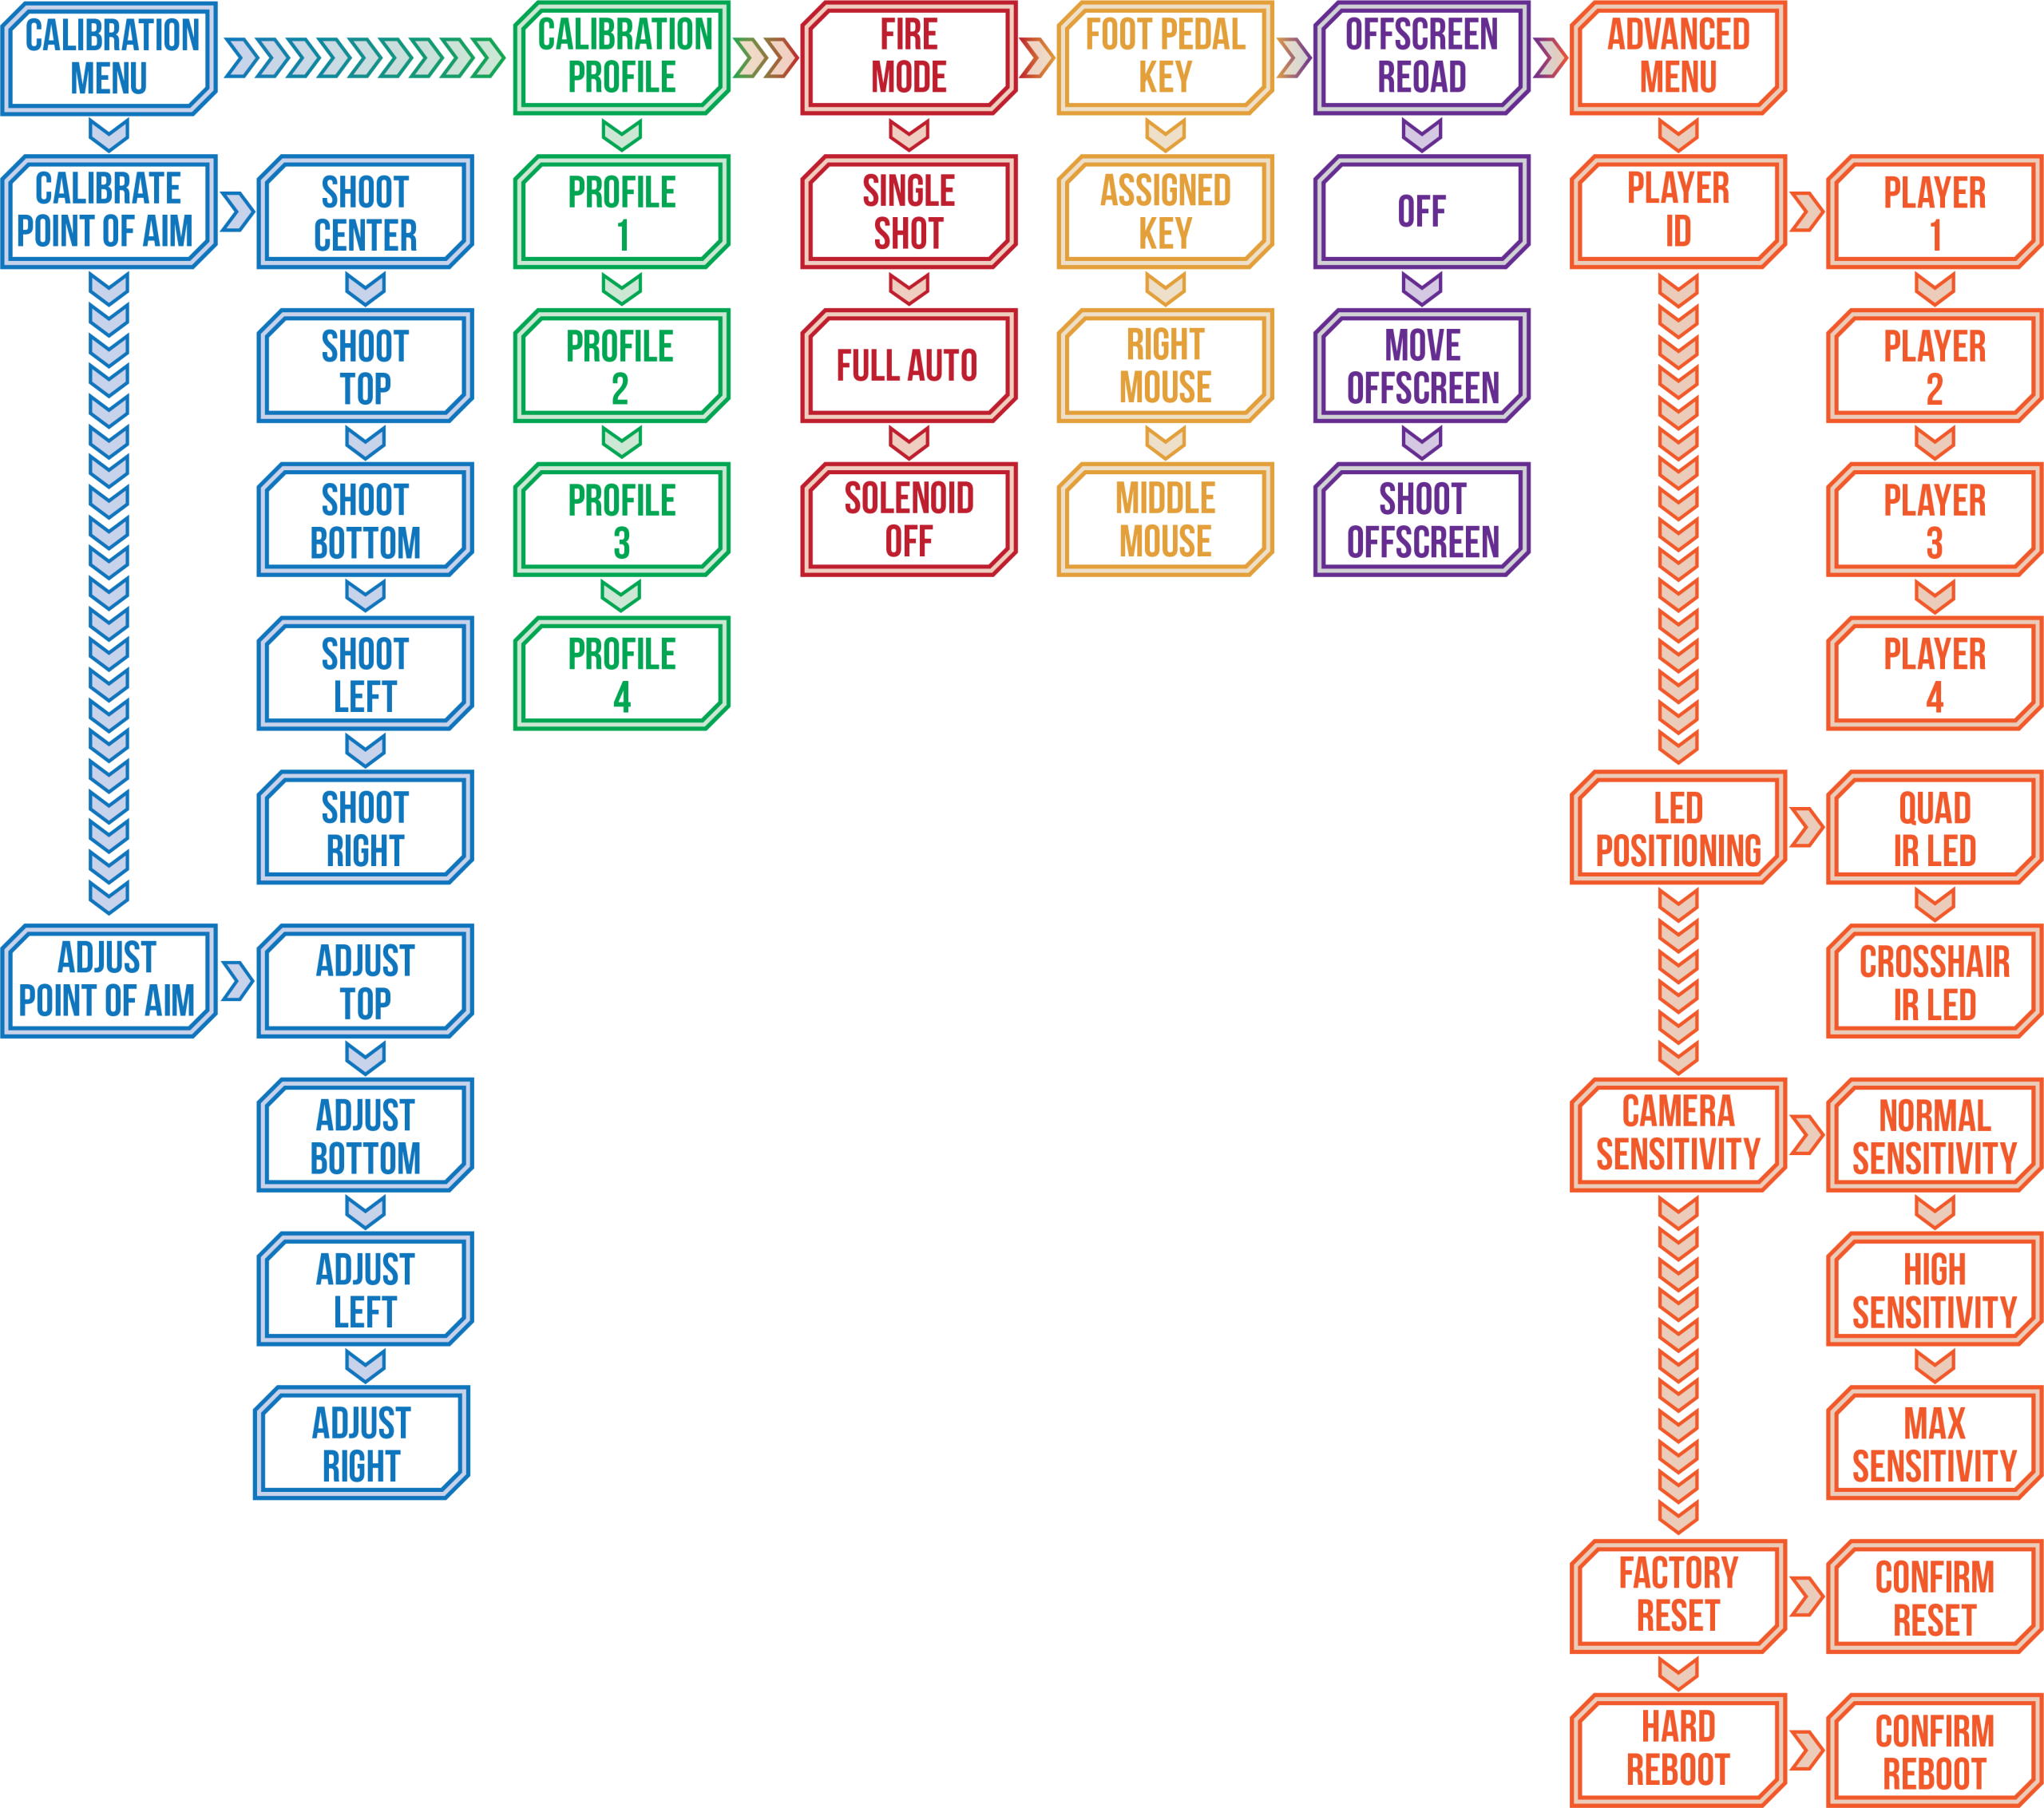
Once you’ve selected a menu, you MUST select an option or exit the entire menu system. When you select a menu option it will save your selection and will exit the menu to game play mode. There are a couple of exceptions to this navigation where the settings require a firmware reboot. Each of these selections will exit the menu system and initiate a board reset in order for the changes to take effect:
- Select Player Id – when a new Player Id is selected
- IR Camera Sensitivity Level – when a new sensitivity level is selected
- Factory Reset – after double confirmation
Calibration Menu
This is the first option on the menu as it’s the first thing you must do with every Blamcon light gun. The Blamcon CORE gives you the ability to configure up to 4 different calibration profiles, for each support LED configuration. This means there are four profiles for Quadrilateral LED, and four profiles for Crosshair. That’s a total of 8 different profiles so you can setup and use your Blamcon with different LED configurations without having to re-calibrate each time.
The calibration process includes an LED guidance system. The addressable LED guidance system will change colors to help you understand what the camera is detecting and whether you need to make any corrections to get the best result from the calibration process. Your goal is to have a green LED before capturing each of the five cursor positions. Here’s a simple guide or legend to help you understand what each LED color represents and any corrections you should make.
- Red – If the addressable LED is red then it can’t see any of your IR LEDs.
- Check that your IR LEDs are plugged in and on. The human eye can’t see IR light but an easy trick is to use your phone camera. Hold the camera up to the IR LEDs and you should see a purple glow.
- Check your distance to the screen. Try stepping back so the camera can see all four IR LEDs in its view. If you have a compatible fisheye lens, try installing that to increase the camera’s field of vision.
- Amber – If the addressable LED is amber means that the camera can see some IR LEDs but not all four.
- Check your distance to the screen. Try stepping back so the camera can see all four IR LEDs in its view. If you have a compatible fisheye lens, try installing that to increase the camera’s field of vision.
- Blue – If the addressable LED is blue means that the camera can see all four IR LEDs but an angle has been detected. This is usually normal.
- You are holding the lightgun at a slight angle. A natural position is to hold the light gun controller slightly off center. Try tilting the camera slowly in either direction. If small adjustments make the LED turn green then hold and continue the calibration process. If you can’t get the LED to turn green, then it may indicate that your camera is installed incorrectly.
- Check the camera installation. If you purchased a kit from Props3D, it should come clearly marked which way is up. If you purchased your camera elsewhere it’s a common mistake to install the camera in the incorrect orientation. Loosen the inset screw and adjust the camera so it’s as close to center as possible.
- Check that your IR LEDs are installed correctly. If you are using a lightbar, check that it’s level as possible and adjust if necessary. If you are using separate IR LEDs, make sure they are installed at the same level and positioned as evenly as possible.
- Green – If the addressable LED is green means that the camera can see all four IR LEDs and there is no detectable angle. Excellent
- Aim down the iron sight and find the cursor. Using a steady hand, capture the cursor position, and repeat the process for all five positions. Each time you move to a new cursor position, make tiny adjustments to get the green LED.
- Don’t worry if you can’t keep the LED in a green steady state. Along as it’s close you should see the LED change between blue and green rapidly means you are close to the threshold and within 2 degrees of a level IR configuration in the camera view.
Calibrating Point of Aim
To start calibration, use the trigger to select the first option in the menu. The addressable LED should be Blue. Once you’ve selected the menu, you must select which profile you want to configure. You will start on Profile 1, and you can press button A to advance the menu to Profile 2. If you press button A, again it will cycle back to Profile 1. Once you’ve selected a profile for calibration, follow these instructions to complete the process.
- Press the trigger to start calibrating
- Rumble will buzz once when entering this step, if present
- Mouse cursor should move to center of the screen
- Aim down the iron sight and find the cursor. Using a steady hand, capture the cursor position.
- Make tiny adjustments to get the green LED.
- When the LED is green, pull the trigger to capture position
- Aim down the iron sight and find the cursor. Using a steady hand, capture the cursor position.
- Mouse cursor should move to top edge of the screen
- Repeat process
- Mouse cursor should move to bottom edge of the screen
- Repeat process
- Mouse cursor should move to left edge of the screen
- Repeat process
- Mouse cursor should move to right edge of the screen
- Repeat process
At this point, the calibration settings will be saved on-board and the menu will exit completely to game play mode. At any time you can cancel the calibration process operation by pressing and holding Reload/Button B for four seconds to exit the menu system.
Adjusting Point of Aim
To start adjusting point of aim, use the trigger to select the first option in the menu. The addressable LED should be Blue. Once you’ve selected the menu, you must navigate to the Adjust Point of Aim menu item. You will start on Calibrate Point of Aim, and you can press button A to advance the menu to Adjust Point of Aim. If you press button A, again it will cycle back to Calibrate Point of Aim. Once you’ve selected Adjust Point of Aim, follow these instructions to complete the process.
- Press the trigger to start Adjusting
- Rumble will buzz once when entering this step, if present
- Mouse cursor should move to top edge of the screen
- Aim down the iron sight and find the cursor.
- Use Button A to move the cursor up, or the Button B to move it down
- Move the cursor into a position best
- Mouse cursor should move to bottom edge of the screen
- Repeat process
- Mouse cursor should move to left edge of the screen
- Repeat process
- Mouse cursor should move to right edge of the screen
- Repeat process
At this point, the calibration settings will be saved on-board and the menu will exit completely to game play mode. At any time you can cancel the adjustment process by pressing and holding Reload/Button B for four seconds to exit the menu system.
Select Calibration Profile
This menu gives you the ability to switch between 4 different calibration profiles. This is convenient if you want to play games in different aspect ratios i.e. 4:3, or if you have different screen setups you want to use your lightgun with, like say, bringing it to a friend’s house.
Once you calibrate the four different profiles you’ll want to switch between them for different games. By default, the firmware will default to Profile 1 until you change it.
Once you’ve entered the configuration menu, navigate to the Select Profile menu pressing button A. It should take one button press from the calibration menu. The addressable LED should be Green. Once you’ve selected the menu, there are two profiles for you to select from. You will start on Profile 1, and you can press button A to advance the menu to Profile 2, then Profile 3, and Profile 4. If you press button A, again it will cycle back to Profile 1. As you navigate the options, the haptic motor will buzz to count the selected profile. For example, when you navigate to Profile 2, you should feel two soft buzzes. Once you’ve navigated to the Profile you want to change to, press the trigger to select it.
At this point, if the Profile was changed it will be saved for future game play. You’ll still be in the configuration menu and back at the top level Select Profile menu. You can navigate to other menu items or exit the menu. At any time you can cancel this selection process by pressing Reload/Button B to exit configuration mode. Once you exit the menu system, the new calibration profile should be in effect.
Full Auto Mode
If your Blamcon light gun has a recoil action, then it has a solenoid installed. By default the recoil action will be a single shot based on the trigger action during game play mode. The Full Auto Mode setting allows you to change the behavior of the recoil to full auto or disabled altogether.
Once you’ve entered the configuration menu, navigate to the Full Auto menu by pressing button A. It should take two button presses from the calibration menu. The addressable LED will change to Red for this menu. Once you’ve selected the menu, there are three settings for you to select from. You will start on the default setting called Single Shot, and you can press button A to advance the menu to Full Auto. If you press button A again it will advance the menu to Disabled. If you press button A again it will cycle back to Single Shot. As you navigate the options, the haptic motor will buzz to count the selected option. For example, when you navigate to Disabled, you should feel three soft buzzes. Once you’ve navigated to the option you want to change to, press the trigger to select it.
At this point, if the setting was changed it will be saved for future game play. You’ll still be in the configuration menu and back at the top level Select Full Auto menu. You can navigate to other menu items or exit the menu. At any time you can cancel this selection process by pressing Reload/Button B to exit configuration mode. Once you exit the menu system, the new Full Auto setting should take effect.
Pedal Reload Mode
If you have a pedal installed with your Blamcon light gun, you find that the default behavior of the pedal is to act as a special key command when it’s activated. The pedal is mapped to the ‘r’ key by default. In some games it’s convenient to have the pedal act as a proxy to the Reload or B button. You can easily switch the pedal function using the Pedal Reload menu.
Once you’ve entered the configuration menu, navigate to the Full Auto menu by pressing button A. It should take three button presses from the calibration menu and the addressable LED will change to yellow for this menu. Once you’ve selected the menu, there are three settings for you to select from. You will start on the default setting called Assigned Key, and you can press button A to advance the menu to Right Mouse option. If you press button A again it will advance the menu to Middle Mouse option. If you press button A again it will cycle back to Assigned Key. As you navigate the options, the haptic motor will buzz to count the selected option. For example, when you navigate to Middle Mouse, you should feel three soft buzzes. Once you’ve navigated to the option you want to change to, press the trigger to select it and save it permanently.
Offscreen Reload Mode
Some games require the ability to reload your weapon by shooting your light gun off screen. By default, the Blamcon light gun disables the trigger button while the camera is aimed offscreen during game play. This setting allows you to enable this feature so you can send a reload command when the trigger is fired while the camera is pointing off screen.
Once you’ve entered the configuration menu, navigate to the Full Auto menu by pressing button A. It should take four button presses from the calibration menu and the addressable LED will change to purple for this menu. Once you’ve selected the menu, there are three settings for you to select from. You will start on the default setting called Off, and you can press button A to advance the menu to Move Offscreen. If you press button A again it will advance the menu to Shoot Offscreen. If you press button A again it will cycle back to Off option. As you navigate the options, the haptic motor will buzz to count the selected option. For example, when you navigate to Shoot Offscreen, you should feel three soft buzzes. Once you’ve navigated to the option you want to change to, press the trigger to select it and save it permanently.
Advanced Menu
Changing Player Id
The firmware for each gun is preset to be player 1 device. However, this can be changed if you want to use two guns at the same time for multiplayer games. There are four player Ids to select so that the gun is registered with a different device Id.
Once you’ve entered the configuration menu, navigate to the Advanced menu by pressing button A. It should take five button presses from the calibration menu and the addressable LED should be Orange. Using the trigger you can select the Advanced menu where the first sub-menu is Player Id. Pressing trigger again will Select Player Id. Once you’ve selected the sub-menu, there are four Player Ids for you to select from. You will start on Player Id 1, and you can press button A to advance the menu to Player Id 2. When you get to Player Id 4, if you press button A again it will cycle back to Player Id 1. As you navigate the options, the haptic motor will buzz to count the selected Player Id. For example, when you navigate to Player Id 3, you should feel three soft buzzes. Once you’ve navigated to the Player Id you want to change to, press the trigger to select it.
At this point, if the Player Id was changed it will be saved for future game play and the firmware will reset for the changes to take effect. This is necessary so that the device can properly register with the Operating System. After a short pause, the gun will be back in game play mode. If the Player Id is not changed, and you’ve selected the same Player Id as before you’ll still be in the configuration menu and back at the top level Select Player Id menu. You can navigate to other menu items or exit the menu. At any time you can cancel this selection process by pressing Reload/Button B to exit configuration mode.
Each Player Id should register as a different device when plugged in. If the device is not being recognized correctly after changing the Player Id, you may need to change your selection. First, unplug the gun and plug it back in to see if it’s recognized. If not, you may need to change Player Id again. If you are only using two guns, then have one gun on Player 1 and change the other to Player 2.
LED Positioning
Blamcon light guns are designed to work with four infrared LEDs arranged around your screen or TV. This setting will allow you to select which orientation you have configured your LED setup, and informs your Blamcon device how to interpret the IR light sources. Default setting is 2-up 2-down arrangement which is two LEDs on top and two and on the bottom. This is the default and recommended setting.
Enter the configuration menu, navigate to the Advanced menu by pressing button A. It should take five button presses from the calibration menu and the addressable LED should be Orange. Using the trigger you can select the Advanced menu where the first sub-menu is Player Id. Pressing A button again will navigate to the next Select LED Positioning option, and press the trigger to select this sub-menu. Once you’ve selected the sub-menu, there are two options for you to choose from. You will start on the default setting 2-Up 2-Down, and you can press button A to advance the menu to next option. Like other menus, when you are at the end of the options if you press button A again it will cycle back to the first option again. As you navigate the options, the haptic motor will buzz to count the selected option. For example, when you navigate to the second option, you should feel two soft buzzes. Once you’ve navigated to the setting you want, press the trigger to select it permanently.
IR Camera Sensitivity Level
You can change the sensitivity of the IR Camera to accommodate the environment you are playing in, or if you have a weaker IR LED setup. There are three settings available: Normal, High, and Max. By default the firmware is programmed with the Normal setting since it’s the most common and reliable setting.
Why should you change the sensitivity? Good question. In general, this is not a setting that you should bother with unless you know what you’re doing. If the IR Camera can not detect your IR LEDs reliably, you may want to try other settings to see if it improves. It can be hard to determine if your LEDs are hard to detect by the camera. First, make sure that you are standing back far enough so that the camera can see all the LEDs, or install the fish-eye lens.
Enter the configuration menu, navigate to the Advanced menu by pressing button A. It should take five button presses from the calibration menu and the addressable LED should be Orange. Using the trigger you can select the Advanced menu where the first sub-menu is Player Id. Pressing A button twice will navigate to the Select Sensitivity Level option, then press the trigger to select this sub-menu. Once you’ve selected the sub-menu, there are three options for you to choose from: Normal, High, Max. You will start on the default setting Normal, and you can press button A to advance the menu to next option. Like other menus, when you are at the end of the options if you press button A again it will cycle back to the first option again. As you navigate the options, the haptic motor will buzz to count the selected option. For example, when you navigate to the second option, you should feel two soft buzzes. Once you’ve navigated to the setting you want, press the trigger to select it permanently.
Factory Reset
You can use this menu option to erase all of the stored settings which effectively sets the firmware back into the state it was shipped or when you install the firmware for the first time.
Enter the configuration menu, navigate to the Advanced menu by pressing button A. It should take five button presses from the calibration menu and the addressable LED should be Orange. Using the trigger you can select the Advanced menu where the first sub-menu is Player Id. Pressing A button three times will navigate to the Factory Reset option, then press the trigger to select this sub-menu. Once you’ve selected the sub-menu, the LED will start flashing. If you pull the trigger again to confirm the operation, it will reset all of the settings and reboot the device automatically.
Reboot for Upgrade
This is a convenient option when you want to reboot your Blamcon so you can upgrade it’s firmware. Choosing this option will reboot your Blamcon as a mass storage device. You’ll see it in your Windows explorer as another drive. From here you can simply drag your firmware UF2 file onto the drive and it will apply the firmware automatically and restart the device.
Enter the configuration menu, navigate to the Advanced menu by pressing button A. It should take five button presses from the calibration menu and the addressable LED should be Orange. Using the trigger you can select the Advanced menu where the first sub-menu is Player Id. Pressing A button four times will navigate to the Reboot for Upgrade option, then press the trigger to select this sub-menu. Once you’ve selected the sub-menu, the LED will start flashing. If you pull the trigger again to confirm the operation, it will reboot the device into mass storage mode automatically.